Post-processing ✨
renderling renders scenes in high dynamic range (HDR), where colors can be
far brighter than a display can show. After the scene is rendered, two
post-processing passes turn that HDR image into the final picture:
- Bloom - bright areas glow, by mixing a blurred copy of the bright parts back into the image.
- Tonemapping - HDR values are mapped into the range the display can show, using an exposure value and a tone mapping algorithm.
Example setup
We’ll use a night sky and a model full of glowing emissive objects, so there are bright areas for the effects to work on. Note that bloom is on by default - we turn it off here so we can show the difference:
    use renderling::{
        camera,
        context::Context,
        glam::{Vec3, Vec4},
        stage::Stage,
    };

    let width = 512;
    let height = 256;
    let ctx = Context::headless(width, height).await;
    // Bloom is on by default - we turn it off so we can show the
    // difference.
    let stage: Stage = ctx
        .new_stage()
        .with_bloom(false)
        .with_background_color(Vec4::new(0.25, 0.25, 0.25, 1.0));

    let projection = camera::perspective(width as f32, height as f32);
    let view = camera::look_at(Vec3::new(0.0, 2.0, 18.0), Vec3::ZERO, Vec3::Y);
    let _camera = stage
        .new_camera()
        .with_projection_and_view(projection, view);

    // A night sky and an emissive-strength test model full of glowing
    // objects, so there are bright areas for the bloom effect to pick up.
    let skybox = stage
        .new_skybox_from_path(workspace_dir().join("img/hdr/night.hdr"))
        .unwrap();
    stage.use_skybox(&skybox);
    let ibl = stage.new_ibl(&skybox);
    stage.use_ibl(&ibl);

    let _model = stage
        .load_gltf_document_from_path(workspace_dir().join("gltf/EmissiveStrengthTest.glb"))
        .unwrap();

    let frame = ctx.get_next_frame().unwrap();
    stage.render(&frame.view());
    let img_no_bloom = frame.read_image().await.unwrap();
    img_no_bloom.save("postprocessing/bloom-none.png").unwrap();
    frame.present();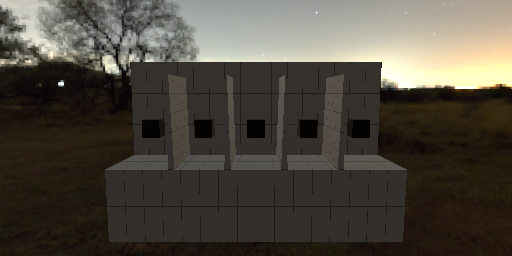
Bloom
Bloom can be toggled at stage creation with Stage::with_bloom, or at
runtime with Stage::set_has_bloom. Two parameters control the look:
Stage::set_bloom_mix_strength- how much of the blurred bright areas to mix back into the image. Defaults to0.04.Stage::set_bloom_filter_radius- the radius of the blur, in texels.
    // Turn bloom on, either at stage creation with `.with_bloom(true)` or
    // at runtime.
    stage.set_has_bloom(true);
    // How much of the blurred bright areas to mix back into the image.
    stage.set_bloom_mix_strength(0.1);
    // The radius of the blur, in texels.
    stage.set_bloom_filter_radius(2.0);

    let frame = ctx.get_next_frame().unwrap();
    stage.render(&frame.view());
    let img_bloom = frame.read_image().await.unwrap();
    img_bloom.save("postprocessing/bloom.png").unwrap();
    frame.present();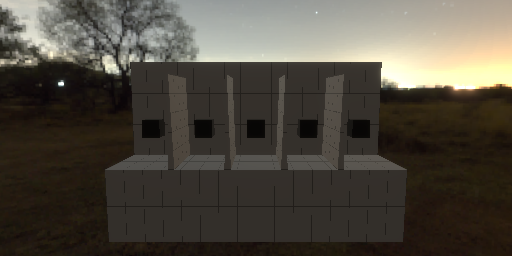
Tonemapping
Before the image is shown, it is multiplied by the exposure and passed through the tone mapping algorithm, which compresses HDR values into the display’s range.
The current configuration is available through the stage’s
Tonemapping as a TonemapConstants - a small struct with two fields:
    // The stage renders in high dynamic range (HDR). Before the image is
    // shown it is multiplied by the exposure and run through the tone
    // mapping algorithm, which maps the HDR values into the display's
    // range.
    let mut config = stage.tonemapping().get_tonemapping_config();
    config.exposure = 3.0;
    stage.tonemapping().set_tonemapping_config(config);

    let frame = ctx.get_next_frame().unwrap();
    stage.render(&frame.view());
    let img_exposure = frame.read_image().await.unwrap();
    img_exposure.save("postprocessing/exposure.png").unwrap();
    frame.present();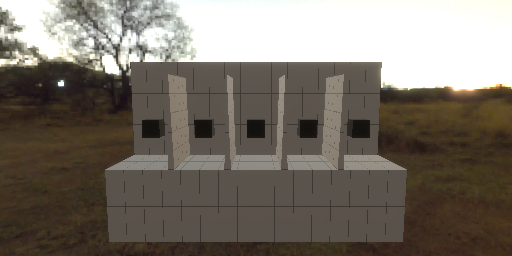
By default no tone mapping algorithm is used (Tonemap::NONE) - HDR values
outside the display range simply clip to white. The available algorithms are:
Tonemap::NONE- no tone mapping, values clip (default)Tonemap::ACES_NARKOWICZ- the popular ACES approximationTonemap::ACES_HILL- the ACES fit by Stephen HillTonemap::ACES_HILL_EXPOSURE_BOOST-ACES_HILLwith a built-in exposure boost, the “filmic” look popularized by three.jsTonemap::REINHARD- the simple Reinhard operator
    use renderling::tonemapping::Tonemap;

    // By default no tone mapping algorithm is used (`Tonemap::NONE`), and
    // HDR values outside the display range simply clip. A filmic operator
    // like ACES compresses the highlights instead.
    config.tonemap = Tonemap::ACES_HILL_EXPOSURE_BOOST;
    config.exposure = 1.0;
    stage.tonemapping().set_tonemapping_config(config);

    let frame = ctx.get_next_frame().unwrap();
    stage.render(&frame.view());
    let img_aces = frame.read_image().await.unwrap();
    img_aces.save("postprocessing/tonemap-aces.png").unwrap();
    frame.present();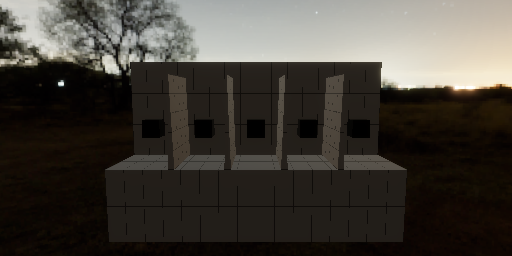
Filmic operators like ACES trade a little saturation for smoother highlights - notice how the bright objects keep more of their color, instead of blowing out to white.