Welcome
Welcome to the renderling operator's manual!
renderling is a cutting-edge, GPU-driven renderer designed to efficiently
handle complex scenes by leveraging GPU capabilities for most rendering
operations. It is particularly suited for indie game developers and researchers
interested in high-performance graphics rendering while working with GLTF files
and large-scale scenes.
The library is written in Rust and supports modern rendering techniques such as forward+ rendering and physically based shading, making it ideal for applications requiring advanced lighting and material effects.
This project is funded through NGI Zero Core, a fund established by NLnet with financial support from the European Commission's Next Generation Internet program. Learn more at the NLnet project page.
![]()

Helpful Links
-
The official website is https://renderling.xyz. Here you can read the latest news and implementation details. You're also likely reading this on this site!
-
The documentation is https://renderling.xyz/docs/renderling/index.html.
-
The GitHub repo and issue track is https:://github.com/schell/renderling.
-
The project site on NLnet is https://nlnet.nl/project/Renderling/
Setup
renderling is a Rust library, so first you'll need to get familiar with the
language. Visit https://www.rust-lang.org/learn/get-started if you're not
already familiar.
Once you're ready, start a new project with cargo new.
Then cd into your project directory and add renderling as a dependency:
cargo add --git https://github.com/schell/renderling.git --branch main
patch crates.io
renderling is special in that all the shaders are written in Rust using
Rust-GPU, which is currently between
releases. For this reason we need to add an entry to the [patch.crates-io]
section of our Cargo.toml:
[patch.crates-io]
spirv-std = { git = "https://github.com/rust-gpu/rust-gpu.git", rev = "05b34493ce661dccd6694cf58afc13e3c8f7a7e0" }
This is a temporary workaround that will be resolved after the next Rust-GPU release.
The rest is Rust business as usual.
WASM
TODO: write about setting up a WASM project.
Re-exports
renderling re-exports glam from its top level module,
because it provides the underlying mathematical types used throughout the API.
Context
The first step of any renderling program starts with renderling::context::Context.
The Context is responsible for managing the underlying wgpu runtime, including the
instance, adapter and queue.
It also sets up the RenderTarget, according to how the Context was created.
On that note, it's important to know that there are two main ways to create a Context:
- A headless context, which renders to a texture, can be created with
Context::headlessorContext::try_new_headless, depending on your error handling scenario. - A surface context, with a window (possibly from
winit) or a canvas fromweb-sys.
    use renderling::context::Context;

    let ctx = Context::headless(256, 256).await;
Getting a frame
Another important concept is the Frame. Each time you'd like to present a new image
you must acquire a frame from the Context with Context::get_next_frame
and present it with Frame::present.
Presenting on WASM
When on WASM (aka running in a browser), Frame::present is a noop.
It's still a good idea to use it though, so you don't forget when programming in native.
Saving the frame
You can also read out the frame to an image provided by the image
crate. See the Frame docs for help with the read_* functions.
Frame example
    let frame = ctx.get_next_frame().unwrap();
    // ...do some rendering
    //
    // Then capture the frame into an image, if you like
    let _image_capture = frame.read_image().await.unwrap();
    frame.present();
Staging resources 🎭
The Stage is the most important type in renderling.
It's responsible for staging all your scene's data on the GPU, as well as
linking all the various effects together and rendering it all.
Stage creation
The Stage is created with Context::new_stage.
    use renderling::{context::Context, glam::Vec4, stage::Stage};

    let ctx = Context::headless(256, 256).await;
    let stage: Stage = ctx
        .new_stage()
        .with_background_color(Vec4::new(0.5, 0.5, 0.5, 1.0));
Notice that context creation is asynchronous. Most of the renderling API is
synchronous, but context creation is one of two exceptions - the other being
reading data back from the GPU.
Also note that we can set the background color of the stage using a Vec4.
Above we've set the background to a light gray.
Resource creation
Now we'll begin using the Stage to create our scene's resources. At the end of
all our staging we should end up with a Camera and one simple
Primitive representing a colored unit cube, sitting right in
front of the camera.
Camera
In order to see our scene we need a Camera.
The camera controls the way our scene looks when rendered. It uses separate projection and view matrices to that end. Discussing these matrices is out of scope for this manual, but there are plenty of resources online about what they are and how to use them.
glam and re-exports
One important detail about these matrices, though, is that they come from the glam
library. Specifically they are Mat4, which are a 4x4 transformation matrix.
Creation
On with our camera. Creation is dead simple using Stage::new_camera.
    use renderling::{
        camera::Camera,
        glam::{Mat4, Vec3},
    };

    let camera: Camera = stage
        .new_camera()
        .with_default_perspective(256.0, 256.0)
        .with_view(Mat4::look_at_rh(Vec3::splat(1.5), Vec3::ZERO, Vec3::Y));
    // This is technically not necessary because Stage always "uses" the first
    // camera created, but we do it here for demonstration.
    stage.use_camera(&camera);
Each resource returned by the many Stage::new_* functions return resources that adhere
to the builder pattern. That means the value a Stage::new_* function returns
can be chained with other calls that configure it. This pattern is nice because it
allows your editor to display the customizations available, which makes API discovery
easier for everyone.
Above we use Camera::with_default_perspective to
set the camera to use a default perspective projection.
Note that usually when we create a Camera, we have to tell
the Stage that we want to use the camera, but the first Camera created will
automatically be used. We could potentially have many cameras and switch them around at will
by calling Stage::use_camera before rendering.
Geometry
The first step to creating a Primitive is staging some vertices in a triangle
mesh. For this example we'll use the triangle mesh of the unit cube. The
renderling::math module provides a convenience function for generating this mesh.
    use renderling::geometry::{Vertex, Vertices};

    let vertices: Vertices = stage.new_vertices(renderling::math::unit_cube().into_iter().map(
        |(position, normal)| {
            Vertex::default()
                .with_position(position)
                .with_normal(normal)
                .with_color({
                    // The color can vary from vertex to vertex
                    //
                    // X axis is green
                    let g: f32 = position.x + 0.5;
                    // Y axis is blue
                    let b: f32 = position.y + 0.5;
                    // Z is red
                    let r: f32 = position.z + 0.5;
                    Vec4::new(r, g, b, 1.0)
                })
        },
    ));
Here we create Vertices, which stages the unit cube points on the GPU.
Next we'll unload those points from the CPU, to free up the memory:
    use renderling::types::GpuOnlyArray;

    let vertices: Vertices<GpuOnlyArray> = vertices.into_gpu_only();
Unloading the CPU memory like this isn't strictly necessary, but it's beneficial to
know about. If we were planning on inspecting or modifying the underlying
Vertex values with Vertices::get_vertex and
Vertices::modify_vertex, we could skip this step.
After unloading, however, we can still set a Vertex at a specific
index using Vertices::set_vertex.
Material
Next we stage a Material.
Materials denote how a mesh looks by specifying various colors and shading values, as well as whether or not the material is lit by our lighting, which we'll talk about in later chapters. For now we'll provide a material that doesn't really do anything except let the vertex colors show through.
    let material = stage
        .new_material()
        .with_albedo_factor(Vec4::ONE)
        .with_has_lighting(false);
Primitive
Now that we have some Vertices and a Material we can create our primitive
using the familiar builder pattern.
    let prim = stage
        .new_primitive()
        .with_vertices(&vertices)
        .with_material(&material);
We don't actually do anything with the primitive at this point though.
Rendering
Now the scene is set and we're ready to render.
Rendering is a three-step process:
- Get the next frame
- Render the staged scene into the view of the frame
- Present the frame
    let frame = ctx.get_next_frame().unwrap();
    stage.render(&frame.view());

    let img = frame.read_image().await.unwrap();
    img.save("stage-example.png").unwrap();
    frame.present();
Above we added an extra step where we read an image of the frame from the GPU, so we can see it here.
Results
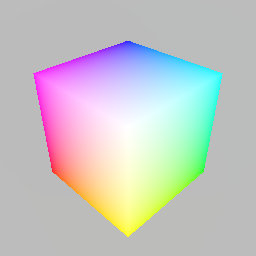
And there you have it! We've rendered a nice cube.
Removing resources
To remove resources from the stage we can usually just Drop them from all
scopes. There are a few types that require extra work to remove, though.
Primitives must be manually removed with Stage::remove_primitive,
which removes the primitive from all internal lists (like the list of draw calls).
Lights must also be removed from the stage for similar reasons.
Now we'll run through removing the cube primitive, but first let's see how many bytes we've committed to the GPU through the stage:
    let bytes_committed = stage.used_gpu_buffer_byte_size();
    println!("bytes_committed: {bytes_committed}");
As of this writing, these lines print out 8296, or roughly 8k bytes.
That may seem like a lot for one cube, but keep in mind that is a count of
all bytes in all buffers, including any internal machinery.
Now let's remove the cube primitive, drop the other resources, and render again:
    let staged_prim_count = stage.remove_primitive(&prim);
    assert_eq!(0, staged_prim_count);
    drop(vertices);
    drop(material);
    drop(prim);

    let frame = ctx.get_next_frame().unwrap();
    stage.render(&frame.view());
    let img = frame.read_image().await.unwrap();
    img.save("stage-example-gone.png").unwrap();
    frame.present();
Visibility
If instead we wanted to keep the resources around but make the Primitive invisible,
we could have used Primitive::set_visible.
See the Stage and Primitive docs for more info.
Loading GLTF files 📂
renderling's built-in model format is GLTF, a
versatile and efficient format for transmitting 3D models. GLTF, which stands
for GL Transmission Format, is designed to be a compact, interoperable format
that can be used across various platforms and applications. It supports a wide
range of features including geometry, materials, animations, and more, making it
a popular choice for 3D graphics.
Using GLTF files
The previous section on staging resources covered the creation of
various GPU resources such as Camera, Vertices, Material,
Primitive, and Transform. When you load a GLTF file into renderling,
it automatically stages a collection of these resources. This means that the
GLTF file is parsed, and the corresponding GPU resources are created and
returned to you, allowing you to integrate them into your application
seamlessly.
Example
We'll start by creating our Context, Stage and Camera:
    use renderling::{
        camera::Camera,
        context::Context,
        glam::Vec4,
        glam::{Mat4, Vec3},
        stage::Stage,
    };

    let ctx = Context::headless(256, 256).await;
    let stage: Stage = ctx
        .new_stage()
        .with_background_color(Vec4::new(0.25, 0.25, 0.25, 1.0));

    let _camera: Camera = {
        let aspect = 1.0;
        let fovy = core::f32::consts::PI / 4.0;
        let znear = 0.1;
        let zfar = 10.0;
        let projection = Mat4::perspective_rh(fovy, aspect, znear, zfar);
        let eye = Vec3::new(0.5, 0.5, 0.8);
        let target = Vec3::new(0.0, 0.3, 0.0);
        let up = Vec3::Y;
        let view = Mat4::look_at_rh(eye, target, up);

        stage
            .new_camera()
            .with_projection_and_view(projection, view)
    };
Then we load our GLTF file through the Stage with
Stage::load_gltf_document_from_path, and as long as there are no errors it returns a
GltfDocument:
    use renderling::{gltf::GltfDocument, types::GpuOnlyArray};
    let model: GltfDocument<GpuOnlyArray> = stage
        .load_gltf_document_from_path(workspace_dir().join("gltf/marble_bust_1k.glb"))
        .unwrap()
        .into_gpu_only();
    println!("bounds: {:?}", model.bounding_volume());
On WASM we would use Stage::load_gltf_document_from_bytes as the filesystem
is unavailable.
Notice how in the above example we call GltfDocument::into_gpu_only to
unload the mesh geometry from the CPU.
Render
    let frame = ctx.get_next_frame().unwrap();
    stage.render(&frame.view());
    let img = frame.read_image().await.unwrap();
    img.save("gltf-example-shadow.png").unwrap();
    frame.present();
Result
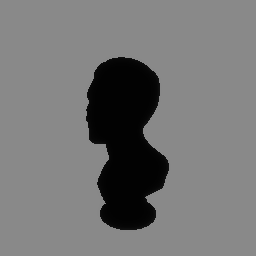
But wait! It's all in shadow.
This is because we haven't added any lighting.
We have two options here:
- Turn of lighting and show the scene "unlit", using
Stage::set_has_lighting - Add some lights
For now we'll go with option 1, as lighting happens in a later section:
stage.set_has_lighting(false);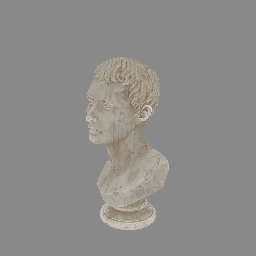
Rendering a skybox 🌌
One of the most striking effects we can provide is a skybox.
Using a skybox is an easy way to improve immersion, and with
renderling your skyboxes can also illuminate the scene, but
we'll save that for a later example. For now let's set up
simple skybox for our marble bust scene.
Building on the stage example
We'll start out this example by extending the example from the loading GLTF files section. In that example we loaded a model of an old marble bust:
    use renderling::{
        camera::Camera,
        context::Context,
        glam::Vec4,
        glam::{Mat4, Vec3},
        stage::Stage,
    };

    let ctx = Context::headless(256, 256).await;
    let stage: Stage = ctx
        .new_stage()
        .with_background_color(Vec4::new(0.25, 0.25, 0.25, 1.0))
        .with_lighting(false);

    let _camera: Camera = {
        let aspect = 1.0;
        let fovy = core::f32::consts::PI / 4.0;
        let znear = 0.1;
        let zfar = 10.0;
        let projection = Mat4::perspective_rh(fovy, aspect, znear, zfar);
        let eye = Vec3::new(0.5, 0.5, 0.8);
        let target = Vec3::new(0.0, 0.3, 0.0);
        let up = Vec3::Y;
        let view = Mat4::look_at_rh(eye, target, up);

        stage
            .new_camera()
            .with_projection_and_view(projection, view)
    };

    use renderling::{gltf::GltfDocument, types::GpuOnlyArray};
    let model: GltfDocument<GpuOnlyArray> = stage
        .load_gltf_document_from_path(workspace_dir().join("gltf/marble_bust_1k.glb"))
        .unwrap()
        .into_gpu_only();
    println!("bounds: {:?}", model.bounding_volume());

    let frame = ctx.get_next_frame().unwrap();
    stage.render(&frame.view());
    frame.present();
Adding the skybox
In renderling, skyboxes get their background from an "HDR" image.
These are typically large three dimensional images. You can find
free HDR images at PolyHaven and other
places around the web.
For this example we'll be using this HDR:
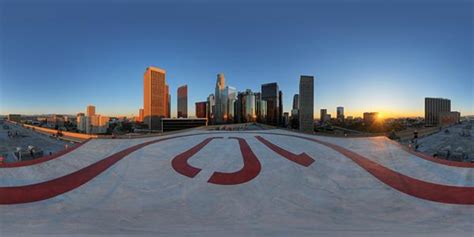
    let skybox = stage
        .new_skybox_from_path(workspace_dir().join("img/hdr/helipad.hdr"))
        .unwrap();
    stage.use_skybox(&skybox);
Then we render:
    let frame = ctx.get_next_frame().unwrap();
    stage.render(&frame.view());
    let image = frame.read_image().await.unwrap();
    image.save("skybox.png").unwrap();
    frame.present();
Results
And there we go!

Lighting 💡
Lighting in renderling comes in a few flavors:
- Unlit - no lighting at all
- Analytical lights - specific lights created by the programmer
- directional
- point
- spot
- Image based lighting - lighting by 3d environment maps
Scene recap
We've already used the "unlit" method of turning off all lighting on the stage.
Let's do a quick recap of our scene, starting where we left off with the skybox example.
We created our context, and then our stage, and it's important to note that we
used .with_lighting(false) on the stage, which tells the stage not to use any
lighting.
This is the "unlit" lighting method mentioned above.
Then we created a camera and loaded a GLTF file of a marble bust, then loaded an HDR image into a skybox, and then rendered:
    use renderling::{
        camera::Camera,
        context::Context,
        glam::Vec4,
        glam::{Mat4, Vec3},
        gltf::GltfDocument,
        stage::Stage,
        types::GpuOnlyArray,
    };

    let ctx = Context::headless(256, 256).await;
    let stage: Stage = ctx
        .new_stage()
        .with_background_color(Vec4::new(0.25, 0.25, 0.25, 1.0))
        .with_lighting(false);

    let _camera: Camera = {
        let aspect = 1.0;
        let fovy = core::f32::consts::PI / 4.0;
        let znear = 0.1;
        let zfar = 10.0;
        let projection = Mat4::perspective_rh(fovy, aspect, znear, zfar);
        let eye = Vec3::new(0.5, 0.5, 0.8);
        let target = Vec3::new(0.0, 0.3, 0.0);
        let up = Vec3::Y;
        let view = Mat4::look_at_rh(eye, target, up);

        stage
            .new_camera()
            .with_projection_and_view(projection, view)
    };

    let model: GltfDocument<GpuOnlyArray> = stage
        .load_gltf_document_from_path(workspace_dir().join("gltf/marble_bust_1k.glb"))
        .unwrap()
        .into_gpu_only();
    println!("bounds: {:?}", model.bounding_volume());

    let skybox = stage
        .new_skybox_from_path(workspace_dir().join("img/hdr/helipad.hdr"))
        .unwrap();
    stage.use_skybox(&skybox);

    let frame = ctx.get_next_frame().unwrap();
    stage.render(&frame.view());
    frame.present();
Now let's learn about analytical lights, and then image based lighting.
Analytical lights
Analytical lighting in real-time rendering refers to the use of mathematical models to simulate the effects of light on surfaces.
What that means in renderling is that analytical lights are the lights that
you create, configure and place programmatically, one by one, into the scene.
To do any lighting, though, we have to turn lighting back on in the stage:
    stage.set_has_lighting(true);

    let frame = ctx.get_next_frame().unwrap();
    stage.render(&frame.view());
    let img = frame.read_image().await.unwrap();
    img.save("lighting/no-lights.png").unwrap();
    frame.present();
As we talked about in the GLTF example, with no lights on the stage, the bust renders in shadow.
Now we're ready to add some lights.
Directional lights
Directional lights simulate light coming from a specific direction, like sunlight. They affect all objects in the scene equally, regardless of their position, and do not diminish with distance. This makes them ideal for simulating large-scale lighting effects.
Let's create a directional light:
    use renderling::{
        color::css_srgb_color_to_linear,
        light::{AnalyticalLight, DirectionalLight, Lux},
    };

    let sunset_amber_sunlight_color = css_srgb_color_to_linear(250, 198, 104);

    let directional: AnalyticalLight<DirectionalLight> = stage
        .new_directional_light()
        .with_direction(Vec3::new(-0.5, -0.5, 0.0))
        .with_color(sunset_amber_sunlight_color)
        .with_intensity(Lux::OUTDOOR_OVERCAST_HIGH);

    let frame = ctx.get_next_frame().unwrap();
    stage.render(&frame.view());
    let img = frame.read_image().await.unwrap();
    img.save("lighting/directional.png").unwrap();
    frame.present();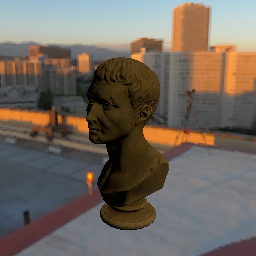
Not bad!
Before moving on we'll remove the directional light:
    stage.remove_light(&directional);
    drop(directional);
Dropping the light isn't strictly necessary, except to reclaim the resources.
Point lights
Point lights emit light equally in all directions from a single point in space, similar to a light bulb. They are ideal for simulating localized light sources and their intensity diminishes with distance, following the inverse square law. This makes them suitable for creating realistic lighting effects in small areas.
Let's create a point light:
    use renderling::light::{Candela, PointLight};

    let point: AnalyticalLight<PointLight> = stage
        .new_point_light()
        .with_position({
            let bust_aabb = model.bounding_volume().unwrap();
            bust_aabb.max
        })
        .with_color(sunset_amber_sunlight_color)
        .with_intensity(Candela(100.0));

    let frame = ctx.get_next_frame().unwrap();
    stage.render(&frame.view());
    let img = frame.read_image().await.unwrap();
    img.save("lighting/point.png").unwrap();
    frame.present();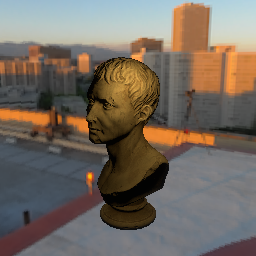
Similarly we'll remove the point light before moving on:
    stage.remove_light(&point);
    drop(point);
Spot lights
Spot lights emit a cone of light from a single point, with a specified direction and angle. They are useful for highlighting specific areas or objects in a scene, such as a spotlight on a stage. The intensity of a spotlight diminishes with distance and is also affected by the angle of the cone, allowing for precise control over the lighting effect.
Let's create a spotlight. One thing about spotlights though, they can be a bit fiddly due to having a position, direction and inner and outer cutoff values. For this reason we'll place the spotlight at the camera's position and point it in the same direction, so you can see the effect:
    use renderling::light::SpotLight;

    let camera_eye = Vec3::new(0.5, 0.5, 0.8);
    let camera_target = Vec3::new(0.0, 0.3, 0.0);
    let position = camera_eye;
    let direction = camera_target - camera_eye;
    let spot: AnalyticalLight<SpotLight> = stage
        .new_spot_light()
        .with_position(position)
        .with_direction(direction)
        // the cutoff values determine the angle of the cone
        .with_inner_cutoff(0.15)
        .with_outer_cutoff(0.2)
        .with_color(sunset_amber_sunlight_color)
        .with_intensity(Candela(12_000.0));

    let frame = ctx.get_next_frame().unwrap();
    stage.render(&frame.view());
    let img = frame.read_image().await.unwrap();
    img.save("lighting/spot.png").unwrap();
    frame.present();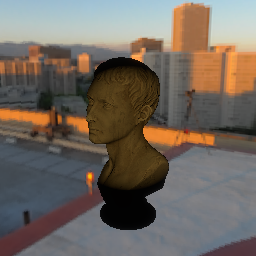
Good enough! Now on to image-based lighting, which uses environment maps to simulate complex lighting scenarios. This technique captures real-world lighting conditions and applies them to the scene, providing more realistic reflections and ambient lighting.
Image based lighting 🌐
Image-based lighting (IBL) is a technique that uses environment maps to illuminate scenes. It captures real-world lighting conditions and applies them to 3D models, providing realistic reflections and ambient lighting. IBL is particularly effective for creating natural-looking scenes by simulating complex lighting scenarios that are difficult to achieve with traditional analytical lights alone.
Example setup
We'll start from where we left off with the skybox example (before adding analytical lights):
    use renderling::{
        camera::Camera,
        context::Context,
        glam::Vec4,
        glam::{Mat4, Vec3},
        gltf::GltfDocument,
        stage::Stage,
        types::GpuOnlyArray,
    };

    let ctx = Context::headless(512, 512).await;
    let stage: Stage = ctx
        .new_stage()
        .with_background_color(Vec4::new(0.25, 0.25, 0.25, 1.0));

    let _camera: Camera = {
        let aspect = 1.0;
        let fovy = core::f32::consts::PI / 4.0;
        let znear = 0.1;
        let zfar = 10.0;
        let projection = Mat4::perspective_rh(fovy, aspect, znear, zfar);
        let eye = Vec3::new(0.5, 0.5, 0.8);
        let target = Vec3::new(0.0, 0.3, 0.0);
        let up = Vec3::Y;
        let view = Mat4::look_at_rh(eye, target, up);

        stage
            .new_camera()
            .with_projection_and_view(projection, view)
    };

    let model: GltfDocument<GpuOnlyArray> = stage
        .load_gltf_document_from_path(workspace_dir().join("gltf/marble_bust_1k.glb"))
        .unwrap()
        .into_gpu_only();

    let skybox = stage
        .new_skybox_from_path(workspace_dir().join("img/hdr/helipad.hdr"))
        .unwrap();
    stage.use_skybox(&skybox);
Now we'll add image based lighting.
The Ibl type
Ibl is the type responsible for image based lighting.
You can think of it as a type of "global" light.
More than one Ibl may exist, but only one can be used
by the stage at render time.
Creating an Ibl follows the same expected builder pattern,
and just like Skybox we call a familiar use_* function
on the Stage to use it:
    use renderling::pbr::ibl::Ibl;

    let ibl: Ibl = stage.new_ibl(&skybox);
    stage.use_ibl(&ibl);

    let frame = ctx.get_next_frame().unwrap();
    stage.render(&frame.view());
    let img = frame.read_image().await.unwrap();
    img.save("lighting/ibl.png").unwrap();
    frame.present();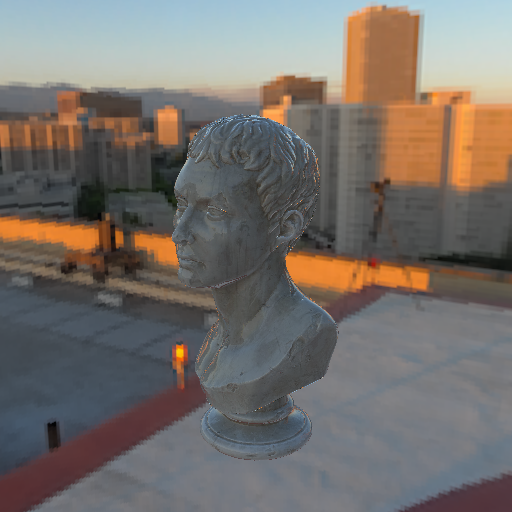
Mix it up! 🎨
You can mix global image based lighting with analytical lights, just as you might expect. Here we'll build on the previous example to add a point light:
    use renderling::{color::css_srgb_color_to_linear, light::Candela};

    let sunset_amber_sunlight_color = css_srgb_color_to_linear(250, 198, 104);
    let _point = stage
        .new_point_light()
        .with_position({
            let bust_aabb = model.bounding_volume().unwrap();
            bust_aabb.max
        })
        .with_color(sunset_amber_sunlight_color)
        .with_intensity(Candela(100.0));

    let frame = ctx.get_next_frame().unwrap();
    stage.render(&frame.view());
    let img = frame.read_image().await.unwrap();
    img.save("lighting/ibl-analytical-mixed.png").unwrap();
    frame.present();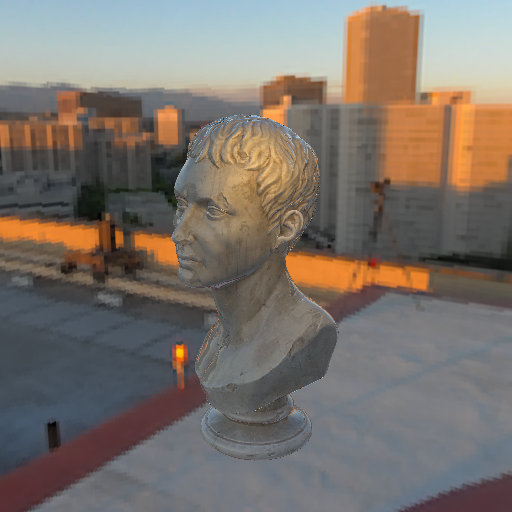
By combining IBL with analytical lights, you can achieve a rich and dynamic lighting environment that captures both the subtle nuances of ambient light and the dramatic effects of direct illumination. Experiment with different environment maps and light setups to find the perfect balance for your scene.