Staging resources 🎭
The Stage is the most important type in renderling.
It's responsible for staging all your scene's data on the GPU, as well as
linking all the various effects together and rendering it all.
Stage creation
The Stage is created with Context::new_stage.
    use renderling::{context::Context, glam::Vec4, stage::Stage};

    let ctx = Context::headless(256, 256).await;
    let stage: Stage = ctx
        .new_stage()
        .with_background_color(Vec4::new(0.5, 0.5, 0.5, 1.0));
Notice that context creation is asynchronous. Most of the renderling API is
synchronous, but context creation is one of two exceptions - the other being
reading data back from the GPU.
Also note that we can set the background color of the stage using a Vec4.
Above we've set the background to a light gray.
Resource creation
Now we'll begin using the Stage to create our scene's resources. At the end of
all our staging we should end up with a Camera and one simple
Primitive representing a colored unit cube, sitting right in
front of the camera.
Camera
In order to see our scene we need a Camera.
The camera controls the way our scene looks when rendered. It uses separate projection and view matrices to that end. Discussing these matrices is out of scope for this manual, but there are plenty of resources online about what they are and how to use them.
glam and re-exports
One important detail about these matrices, though, is that they come from the glam
library. Specifically they are Mat4, which are a 4x4 transformation matrix.
Creation
On with our camera. Creation is dead simple using Stage::new_camera.
    use renderling::{
        camera::Camera,
        glam::{Mat4, Vec3},
    };

    let camera: Camera = stage
        .new_camera()
        .with_default_perspective(256.0, 256.0)
        .with_view(Mat4::look_at_rh(Vec3::splat(1.5), Vec3::ZERO, Vec3::Y));
    // This is technically not necessary because Stage always "uses" the first
    // camera created, but we do it here for demonstration.
    stage.use_camera(&camera);
Each resource returned by the many Stage::new_* functions return resources that adhere
to the builder pattern. That means the value a Stage::new_* function returns
can be chained with other calls that configure it. This pattern is nice because it
allows your editor to display the customizations available, which makes API discovery
easier for everyone.
Above we use Camera::with_default_perspective to
set the camera to use a default perspective projection.
Note that usually when we create a Camera, we have to tell
the Stage that we want to use the camera, but the first Camera created will
automatically be used. We could potentially have many cameras and switch them around at will
by calling Stage::use_camera before rendering.
Geometry
The first step to creating a Primitive is staging some vertices in a triangle
mesh. For this example we'll use the triangle mesh of the unit cube. The
renderling::math module provides a convenience function for generating this mesh.
    use renderling::geometry::{Vertex, Vertices};

    let vertices: Vertices = stage.new_vertices(renderling::math::unit_cube().into_iter().map(
        |(position, normal)| {
            Vertex::default()
                .with_position(position)
                .with_normal(normal)
                .with_color({
                    // The color can vary from vertex to vertex
                    //
                    // X axis is green
                    let g: f32 = position.x + 0.5;
                    // Y axis is blue
                    let b: f32 = position.y + 0.5;
                    // Z is red
                    let r: f32 = position.z + 0.5;
                    Vec4::new(r, g, b, 1.0)
                })
        },
    ));
Here we create Vertices, which stages the unit cube points on the GPU.
Next we'll unload those points from the CPU, to free up the memory:
    use renderling::types::GpuOnlyArray;

    let vertices: Vertices<GpuOnlyArray> = vertices.into_gpu_only();
Unloading the CPU memory like this isn't strictly necessary, but it's beneficial to
know about. If we were planning on inspecting or modifying the underlying
Vertex values with Vertices::get_vertex and
Vertices::modify_vertex, we could skip this step.
After unloading, however, we can still set a Vertex at a specific
index using Vertices::set_vertex.
Material
Next we stage a Material.
Materials denote how a mesh looks by specifying various colors and shading values, as well as whether or not the material is lit by our lighting, which we'll talk about in later chapters. For now we'll provide a material that doesn't really do anything except let the vertex colors show through.
    let material = stage
        .new_material()
        .with_albedo_factor(Vec4::ONE)
        .with_has_lighting(false);
Primitive
Now that we have some Vertices and a Material we can create our primitive
using the familiar builder pattern.
    let prim = stage
        .new_primitive()
        .with_vertices(&vertices)
        .with_material(&material);
We don't actually do anything with the primitive at this point though.
Rendering
Now the scene is set and we're ready to render.
Rendering is a three-step process:
- Get the next frame
- Render the staged scene into the view of the frame
- Present the frame
    let frame = ctx.get_next_frame().unwrap();
    stage.render(&frame.view());

    let img = frame.read_image().await.unwrap();
    img.save("stage-example.png").unwrap();
    frame.present();
Above we added an extra step where we read an image of the frame from the GPU, so we can see it here.
Results
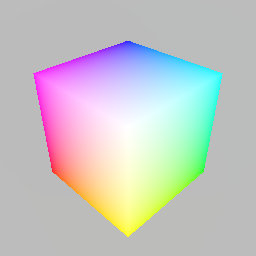
And there you have it! We've rendered a nice cube.
Removing resources
To remove resources from the stage we can usually just Drop them from all
scopes. There are a few types that require extra work to remove, though.
Primitives must be manually removed with Stage::remove_primitive,
which removes the primitive from all internal lists (like the list of draw calls).
Lights must also be removed from the stage for similar reasons.
Now we'll run through removing the cube primitive, but first let's see how many bytes we've committed to the GPU through the stage:
    let bytes_committed = stage.used_gpu_buffer_byte_size();
    println!("bytes_committed: {bytes_committed}");
As of this writing, these lines print out 8296, or roughly 8k bytes.
That may seem like a lot for one cube, but keep in mind that is a count of
all bytes in all buffers, including any internal machinery.
Now let's remove the cube primitive, drop the other resources, and render again:
    let staged_prim_count = stage.remove_primitive(&prim);
    assert_eq!(0, staged_prim_count);
    drop(vertices);
    drop(material);
    drop(prim);

    let frame = ctx.get_next_frame().unwrap();
    stage.render(&frame.view());
    let img = frame.read_image().await.unwrap();
    img.save("stage-example-gone.png").unwrap();
    frame.present();
Visibility
If instead we wanted to keep the resources around but make the Primitive invisible,
we could have used Primitive::set_visible.